Friday, December 22, 2017

COCONUT MILK RECIPES - EASY YUMMY COCONUT MILK JELLY

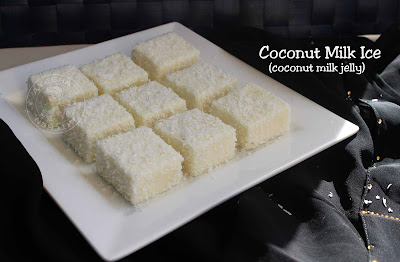
COCONUT JELLY / COCONUT MILK ICE

Coconut milk recipes are always my all time favorite. Especially coconut milk dessert recipes are mouth-watering delicious. Jelly recipes are kids favorite and I thought of sharing an easy jelly recipe with agar agar or china grass and coconut milk. Gelatin is the main ingredient which is used in the preparation of jelly. But I always prefer chinagrass instead of gelatin as chinagrass is purely vegetarian. The rich taste of coconut milk and condensed milk along with the agar agar which acts as a jellying agent, makes this dessert very special. The desiccated coconut used to coat the jelly is the other attraction of this yummy dessert recipe. So let us see how to make coconut milk jelly/ chinagrass pudding/ agar agar pudding/ coconut milk pudding/ yummy pudding recipes/ easy pudding recipes/ jelly recipes.

coconut milk recipes coconut ice pudding recipes coconut milk pudding agar agar china grass pudding easy pudding recipes yummy dessert recipes jelly recipes coconut jelly


coconut milk recipes coconut ice pudding recipes coconut milk pudding agar agar china grass pudding easy pudding recipes yummy dessert recipes jelly recipes coconut jelly

INGREDIENTS

Chinagrass / Agar agar - 10 gm
Milk - 1 cup
Coconut milk - 1 cup, thick milk
Sweetened condensed milk - half a cup or little more
Sugar    - few teaspoon,  for more sweetness
Salt - quarter tsp, to balance the taste
Desiccated coconut  - 4 tbsp, to garnish

PREPARATION

Here is the video showing how to make coconut milk jelly pudding


  • In a pan, add china grass / agar agar along with a half a cup of warm water. Combine well and switch on the flame. Let it cook over a medium flame until it melts completely into a clear liquid. Stir continuously. When done, set aside in a bowl. (be careful that it will set quickly once it is cooled, so stir occasionally until we prepare the milk mixture).
  • Boil milk and coconut milk in a pan. Stir occasionally. When it boils, add the sweetened condensed milk and mix very well. Add a pinch of salt to balance the taste and sugar if required for more sweetness.
  • Combine well and add the prepared agar agar mixture, mixing continuously until the agar agar mixture is well combined. When done, remove from flame and pass this mixture through a strainer to avoid any lumps. 
  • Now you can transfer it to a square tray or any silicon molds and keep refrigerated once it is cooled. 
  • Let it stay in the refrigerator for 6 hours or overnight.
  • Slice it into desired shapes or can use a cookie cutter. Coat it with desiccated coconut and serve.

Wednesday, December 13, 2017

SOUP RECIPES - HOT AND SOUR CHICKEN SOUP

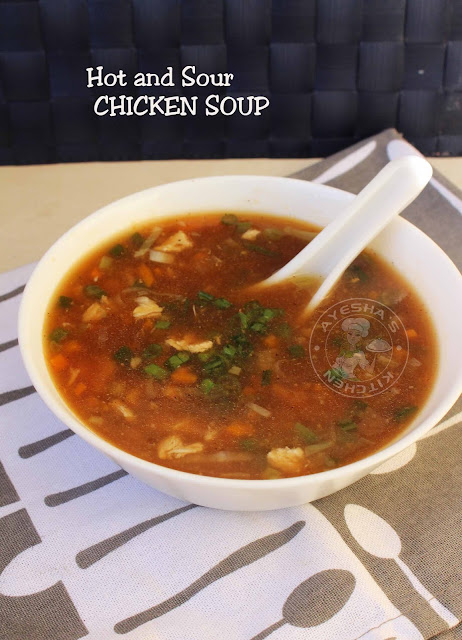
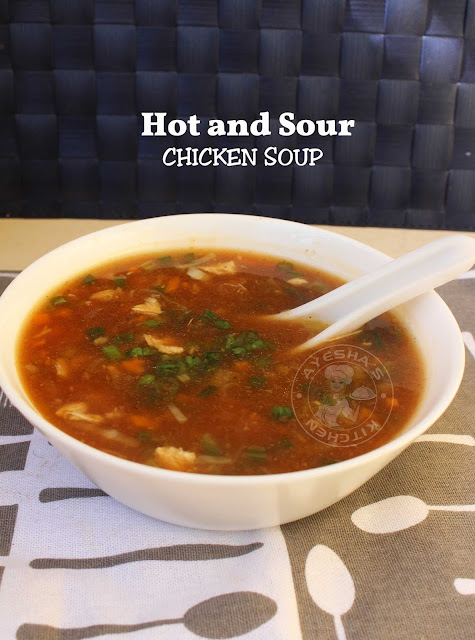
CHICKEN SOUP RECIPES

Soups are hearty comfort food which can be prepared with less mess.  I often make Clear chicken soup recipe at home using fresh chicken stock. For me, chicken soup is my favorite but my daughter loves sweet corn soup the most. So I used to add veggies to my chicken soup like carrots chopped, cabbage chopped, sweet corns like so. Today am going to share the recipe of Hot and sour chicken soup. As the name implies, this soup is little spicy hot. I used fresh chicken stock instead of store bought in this soup recipe. For hot and sour soup, the sauces are the main attraction. So instead of adding each sauce separately, mix everything in a bowl and then add it to the soup for the perfect flavor. So let us see how to make Hot and sour chicken soup at home. 

chicken soup hot and sour chicken soup recipes yummy simple soup recipes diet soup cabbage soup veg soup simple soup to make chicken recipes chinese

chicken soup hot and sour chicken soup recipes yummy simple soup recipes diet soup cabbage soup veg soup simple soup to make chicken recipes chinese

chicken soup hot and sour chicken soup recipes yummy simple soup recipes diet soup cabbage soup veg soup simple soup to make chicken recipes chinese

Other recipes to try


INGREDIENTS (serves 3 )

Chicken breast  - 2 nos, medium sized
Bay leaf  - 1
Water - 2 cups
Butter - 2 tsp, melted
Spring onion white part - 1 tbsp
Garlic chopped - 1 tbsp
Green chilies chopped - 1 tsp, can use more or less
Carrot - 2 tbsp, very finely chopped
Cabbage - 2 tbsp, very finely chopped
Pepper powder - half tsp
Cornflour - 2 tsp mixed in a quarter cup of water
Chopped spring onion - 1 tsp, green part
Salt

For the sauce

Tomato sauce  - 1 tbsp
Soy sauce  - 1 tsp
Sugar - half tsp
Vinegar - 1 tsp

PREPARATION

Please check the below video showing how to make hot and sour chicken soup 

  • Put the chicken breast in a pan along with bay leaf and two cups of water. Let it cook until chicken becomes tender. When done, take out the chicken breast and set aside the water discarding the bay leaf. Chop the cooked chicken breast into small cubes. Set aside in another bowl.
  • Now mix together all the ingredients given under 'for the sauce' and set aside.
  • Now heat a wok with butter. Saute the chopped spring onion white part, chopped garlic, and chopped green chilies. saute for a minute and then add carrot chopped and cabbage chopped.
  • After a minute, add the chicken cubes and give a fine mix. Add stock water and let it cook for 5 minutes. 
  • To this, add pepper powder and salt. Add the prepared sauce mixture and mix well. 
  • Finally, add the cornflour slurry and let it cook for 2 minutes, stirring continuously. Garnish with chopped spring onion.
  • Serve piping hot and enjoy.
  • Please SUBSCRIBE  AYESHAS KITCHEN for more yummy videos. Thank u.

Sunday, December 10, 2017

OVERNIGHT OATS WITH YOGURT AND COCOA POWDER - WEIGHT LOSS RECIPES

Overnight oats recipe

Do not ever skip your breakfast meal even on those lazy or busy days. Instead, go for this simple yet healthy breakfast oats. Sometimes, we will sacrifice our health for the sake of convenience by heating up frozen meals. We don't want to waste our valuable time in the kitchen,  making breakfast. Like so, we all know that shedding weight by cutting down the breakfast is not at all good for health. Still many of us are very careless about our breakfast. So for those who want to whip up their breakfast meal within minutes without sacrifice on taste, here is my healthy weight loss recipe that will be ready in no time and help you to shed weight. You can check my blog for many other weight loss recipes and overnight oats recipes. Here i used chia seeds, cocoa powder, and greek yogurt for this no cooking oats recipe. Do you know the health benefits of cocoa powder? It is not just a great way to satisfy your sweet tooth but it is also a way to shed weight when used in moderation. So let us see how to make overnight oats with yogurt and cocoa powder.

overnight oats with yogurt and cocoa powder weight loss oats recipes quaker oats yummy coconut milk recipes breakfast recipes

overnight oats with yogurt and cocoa powder weight loss oats recipes quaker oats yummy coconut milk recipes breakfast recipes


INGREDIENTS (SERVES 2)

Quaker oats    - 1 cup
Low-fat milk  - 1 cup + quarter a cup (if required)
Yogurt      - quarter a cup
Chia seed - 3  tsp
Unsweetened cocoa powder - 1 tbsp or more
Dates puree - 3 tbsp (for sweetness)
Apple - 1, chopped
Grapes - as required (or can use any fruits of your choice)


PREPARATION

Here is the video showing how to make overnight oats with yogurt


  • In a jar (i took a big one which serves two) add quaker oats along with a cup of low-fat milk or Almond milk and yogurt. Combine well with a spoon. To this, add chia seeds and again mix well to combine. Keep it in the refrigerator for at least 5 hours or preferably overnight. 
  • The next day, transfer it to a bowl and add quarter a cup of low-fat milk, mix well. (it is optional only. I love a semi-thick consistency and so i prefer this way.) 
  • To this, add cocoa powder and dates puree (soak 5 dates in warm water and squeeze it well with hands and pass it through a strainer to get the puree).  Again mix well. Here dates puree is used for the sweetness and so use accordingly. 
  • SERVE - Now take two serving bowls, add some chopped apple and grapes, pour this oats mixture, and drizzle some dates puree and serve. Yummy overnight oats ready.

Saturday, December 9, 2017

PANEER TIKKA MASALA RECIPE - NO ONION RECIPE

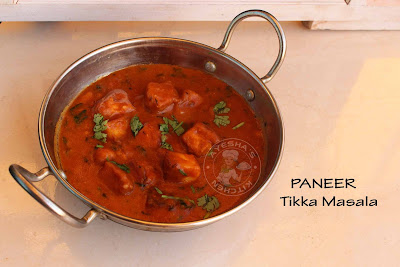
PANEER TIKKA MASALA RECIPE

Paneer tikka masala is a very popular veg side dish recipe and can be prepared in different ways. It is usually served along with butter nan, chapati, paratha like so.  I have shared a paneer tikka masala on my blog a few months back. That recipe calls for onion but here am sharing yet another variation in paneer tikka masala without onion. For this recipe, i used Homemade paneer which is very simple to make at home. All you need for making Paneer at home is Milk and lemon juice. Cooking is my passion and i love to cook for my family, friends, and relatives. Nourishing the heart and soul of people through yummy food is something great for a passionate cook like me. Restaurant style paneer tikka masala is very much liked by most of us. Though am not a paneer recipe lover, i love to have this restaurant style paneer tikka masala. So let us see how to make paneer tikka masala recipe without onion. 
Paneer tikka masala paneer recipe indian cottage cheese no onion recipe veg side dish butter nan vegetaian perfect paneer tikka

Paneer tikka masala paneer recipe indian cottage cheese no onion recipe veg side dish butter nan vegetaian perfect paneer tikka

Paneer tikka masala paneer recipe indian cottage cheese no onion recipe veg side dish butter nan vegetaian perfect paneer tikka


Also, check this recipe

INGREDIENTS

Paneer - 200 g, how to make paneer at home
Oil

To marinate paneer

Gram flour / besan / kadalamavu - 2 tbsp
Curd  - 2 tsp
Coriander powder - half tsp
Turmeric powder - quarter tsp
Chili powder   - half tsp
Salt - little

For the masala

Cumin seed   - quarter tsp
Hing / kayam - quarter tsp
Coriander powder - 1 tsp
Turmeric powder - quarter tsp
Kasuri methi - 1 tsp
Ginger paste - half tsp
Tomato paste - grind together 2 ripe tomatoes in a blender
Red chili powder - 1 tbsp
Cornflour - 1 tbsp
Sugar  - half tsp
Salt - as required
Garam masala powder - quarter tsp
Coriander leaves - few, chopped
Fresh cream   - 1 tbsp (or use 2 tbsp of butter)


PREPARATION

Here is the video showing how to make paneer tikka masala


  • Marinate the paneer with gram flour, curd, coriander powder, turmeric powder, chili powder, and salt. Keep refrigerated for 30 minutes (very important).
  • Now heat oil in a pan for shallow frying. Fry the paneer until both sides turn slightly golden. Transfer it to a plate. Set aside.
  • Heat a wok with 2 tbsp of oil. Splutter cumin seeds. When done, make the flame to very low. Now add hing, coriander powder, turmeric powder. Saute well for a minute. Then add kasuri methi and ginger paste. Saute until the raw smell disappears.
  • Now make the flame to medium and add the tomato paste along with chilli powder.  Combine very well and cook until oil floats on the top. 
  • Then add the cornflour mixed water and combine well.
  • Add sugar, garam masala powder and check for salt. 
  • Now add chopped coriander leaves and mix well. 
  • Add the fried paneer now. Let it cook for 4 minutes. Finally, add a tbsp of fresh cream (or can use 2 tbsp of butter.). Cook for a minute and serve hot.

Monday, December 4, 2017

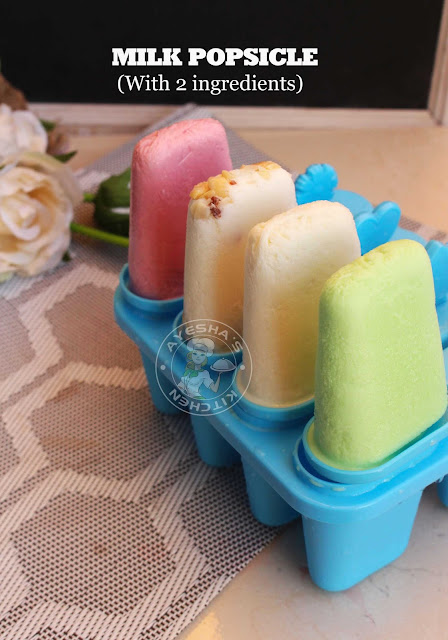
2 INGREDIENT MILK POPSICLE - POPSICLE RECIPES

MILK POPSICLE

Milk popsicle recipe or popularly known as Paal ice is a nostalgic popsicle with very few ingredients. In my school days, Summer holidays are incomplete without milk popsicle (paal ice) and sip ups. Today while am making this milk popsicle, my mind reminds me of those school days with my friends and cousins. I really miss each and every moment we spent together and those days we are living for today and there were no tomorrows. But today everything changed and we are living for tomorrow's only. Lil bit Nostalgic feel .right?  Ok. Let's move on to the recipe. Here am going to share the recipe for Milk popsicle with just two ingredients. Full cream milk and sweetened condensed milk are the two ingredients required for making this simple and quick popsicle recipe. Vanilla essence, rose milk essence, pista essence is the other ingredients which add color and flavor to this popsicle. Milk popsicle with nuts is really awesome. You can also add a few drops of chocolate sauce to this milk mixture for chocolate milk popsicle recipe. So hope you all give this popsicle recipe a try and drop your valuable feedback in the comment box below.

Milk popsicle paal ice 2 ingredient popsicle recipe summer cool drinks milk recipes simple kids desserts kerala paal ice sarbath

Milk popsicle paal ice 2 ingredient popsicle recipe summer cool drinks milk recipes simple kids desserts kerala paal ice sarbath

Milk popsicle paal ice 2 ingredient popsicle recipe summer cool drinks milk recipes simple kids desserts kerala paal ice sarbath

INGREDIENTS

Boiled and cooled milk  - 550 ml
Sweetened condensed milk - half a cup
Vanilla essence  -  quarter tsp
Rose milk essence - 2 drops, for pink color
Pista essence          - 2 drops, for green color
Cashews or almonds or pistachios chopped - 2 tbsp or more
Popsicle molds - can make 8 popsicles

PREPARATION

Here is the video showing how to make this simple milk ice popsicle


  • Dry the popsicle mold well and set aside ready.
  • Boil the milk (full cream) and cool it. Set aside ready.
  • Now let us make the milk mixture - In a bowl, add the boiled and cooled milk. To this, add the sweetened condensed milk. Mix very well until well combined.
  • Now add vanilla essence. This gives a fine flavor or u can skip this and pour this milk mixture into the popsicle mold. 
  • Here am showing four flavors of milk popsicle in a single recipe. 
  • Pour two popsicle molds with this plain milk mixture. Other two popsicle molds with nuts and milk mixture. 
  • Mix pista essence with some milk mixture in a cup and pour into the popsicle mold.
  • Mix rose milk essence with some milk mixture in a cup and pour into the popsicle mold.
  • Close it tightly.
  • Let it freeze for 8  hours.
  • When done, take out the mold. Keep it outside down and show it under tap water for 10 seconds (do not keep it more as it will melt).
  • Then gently open it and enjoy.
  • It is very hard to take a perfect picture of a popsicle as it melts within minutes. (so please excuse me for the same).

Saturday, December 2, 2017

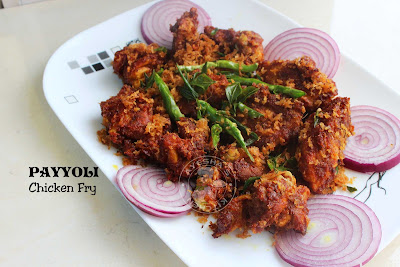
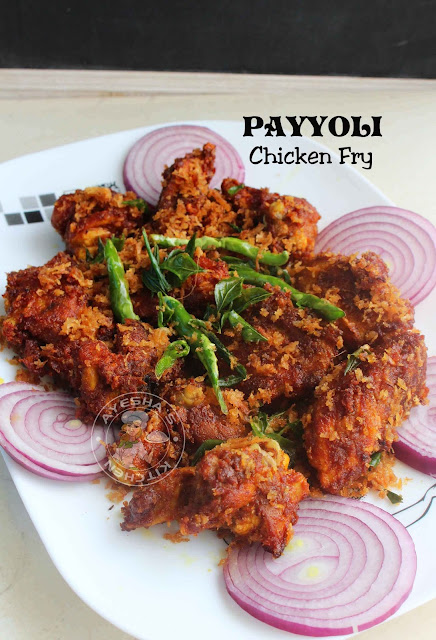
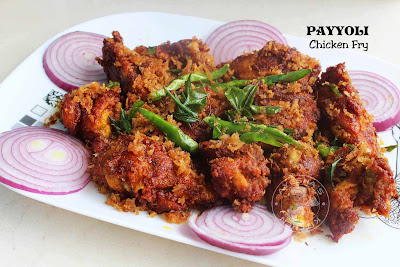
TASTY CHICKEN FRY RECIPE - PAYYOLI CHICKEN FRY

CHICKEN FRY RECIPE / KERALA RECIPES

Chicken fry recipe is the simplest chicken recipe which can be made in different ways and styles. The chicken dish which we always prefer to cook at home on those lazy days. I have shared many chicken fry recipes on my blog such as Spicy chicken fry, Thattukada chicken fry, Pepper chicken fry like so. This chicken fry recipe is a Kerala style chicken fry with Kerala spices. Payyoli chicken fry is a Malabar special chicken fry recipe which is very flavorful. This dry chicken dish is very popular among Keralites, especially among Malabaris. Payyoli is a place in Kozhikode district which is situated in the South Indian state of Kerala. Payyoli is also famous in the name of PT Usha, as it is the hometown of This Athlete. This chicken fry is very popular in Payyoli. Now this recipe has become our family favorite too. Chicken pieces are well marinated in the spicy chicken marinade and then fried in coconut oil until crispy.  Later it is served along with crispy fried scraped coconut, curry leaves and green chilies which makes this chicken fry recipe more special. 

chicken fry recipe

chicken fry recipe payyoli chicken fry paragon restaurant style sabka sagar calicut kozhikode ayeshas kitchen malabar recipes chicken dish spicy kerala recipes

chicken fry recipe payyoli chicken fry paragon restaurant style sabka sagar calicut kozhikode ayeshas kitchen malabar recipes chicken dish spicy kerala recipes

INGREDIENTS

Chicken     - 400 g, make medium sized pieces
Coconut oil   - for deep frying
Scraped coconut - 4 tbsp
Green chilies  - 4 nos, slit
Curry leaves  - a handful of

Marinate with

Kashmiri chili powder  - 1 tbsp
Turmeric powder     - half tsp
Coriander powder    - 1 tsp
Meat masala powder- half tsp
Ginger garlic paste   - 2 tsp
Vinegar    - 2 tbsp
Cornflour - 3 tbsp
Salt - to taste

PREPARATION

Check below video showing how to make Payyoli chicken fry


  • Cut the chicken into medium sized pieces and set aside. (Here is a tip while you using frozen chicken. Just soak the chicken pieces in salt and vinegar water (after cleaning) for 10 minutes. Then transfer it a colander and set aside)
  • Make a chicken marinade with chili powder, turmeric powder, coriander powder, meat masala powder, ginger garlic paste, vinegar, and salt. Marinate the chicken pieces in this marinade and keep refrigerated for 15 minutes (not more than that).
  • After 15 minutes, add cornflour (just before you are going to fry the chicken). Combine well.
  • Heat oil for deep frying.
  • Once hot, make the flame to medium. Then fry the green chilies and curry leaves. Transfer it to a bowl. Then fry scraped coconut. Fry until slightly golden (be careful while frying coconut, it will burn quickly). Transfer it a bowl. Set aside.
  • Now slide the marinated chicken pieces one by one to the hot oil. Do not fry overcrowded. Flip only when one side is done. Fry until both sides turn golden and crisp. When done, transfer it to a plate.
  • Now combine chicken fry with the fried coconut, curry leaves, and green chilies. Serve hot.
  • Please subscribe to my channel Ayeshas kitchen for more quick video recipes.
Chicken 65 making video here - How to make perfect chicken 65
Chicken chizza making video here - How to make chicken chizza

Thursday, November 30, 2017

BATICA RECIPE / GOAN CHRISTMAS CAKE - BOLO DE RULAO

BAATH / BATICA RECIPE

Waiting for simple and easy yet outstanding cake recipe for Christmas? Then here is the recipe for a semolina COCONUT cake without flour(All purpose flour/ maida).This cake is also known as Bolo De Rulao (cream of wheat cake) which is commonly made during Christmas in every Goan households. This cake (Batica )has a dry texture like cornbread.  The batter of this cake must set aside overnight or for 10 hours at room temperature which makes this cake soft. Really this is a scrumptious cake. I highly recommend giving this cake a try. 

batica bath goan recipe  goan cake christmas cake recipes semolina coconut cake yummy simple cakes coconut cake best christmas cake recipes desserts cakes

batica bath goan recipe  goan cake christmas cake recipes semolina coconut cake yummy simple cakes coconut cake best christmas cake recipes desserts cakes

batica bath goan recipe  goan cake christmas cake recipes semolina coconut cake yummy simple cakes coconut cake best christmas cake recipes desserts cakes


INGREDIENTS

Egg    - 3 nos, at room temperature
Sugar - half a cup
Oil     - quarter a cup
Semolina / rawa      - 1.5 cups
Grated coconut, slightly crushed - 1.5 cups
Baking powder       - 1 tsp, leveled
Salt                         - quarter tsp
Cardamon powder - quarter tsp, optional

PREPARATION

Here is the video showing how to make this Semolina coconut cake


  • Line the baking tray with butter paper and set aside ready.
  • Crush the freshly scraped coconut by pulsing it in a blender for a second or two (like crumbs). Add this crushed coconut to a bowl along with fine semolina, baking powder, and salt. Combine it well with a spoon (the mixture should resemble breadcrumbs). Set aside.
  • Now in a large bowl, add eggs(must be at room temperature). To this add sugar and beat until white and fluffy.
  • Then add vegetable oil and whisk again well. Now you can add cardamom powder (i skip this, but still it tastes perfect).
  • Now pour this egg mixture little by little into the semolina mixture. Fold it very well using a spoon or spatula. 
  • Now transfer it to the prepared baking tray and cover it with a foil paper. Keep it at room temperature overnight (10 hours) or at least 6 hours. 
  • Then remove the silver foil on the top of the pan and bake in a preheated oven at 180 degree C for 25 to 30 minutes or till brown and cooked through. (check with a toothpick, if it comes out clean when inserted then the cake is ready )
  • Remove from oven and let it cool to room temperature before demolding. 
  • Then take out the semolina cake off the butter paper and slice. Really it is a scrumptious cake. Must try this at least once in a lifetime. 
  • Please SUBSCRIBE my Youtube channel - Ayeshas kitchen

My Other Cake Recipes:


Monday, November 27, 2017

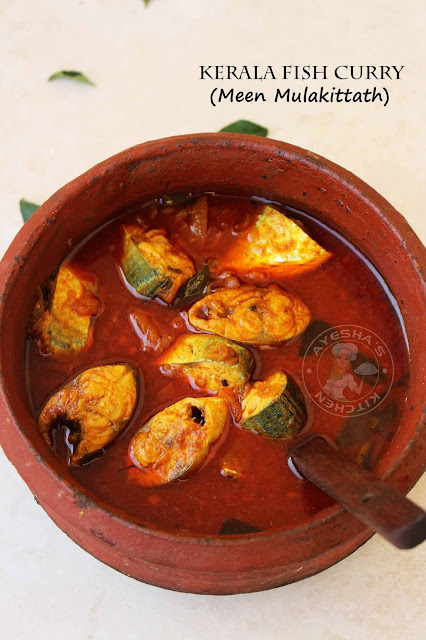
KERALA SPICY FISH CURRY - SPICY MACKEREL / AYALA CURRY

KERALA RECIPES / MACKEREL FISH CURRY

Malabar style fish curry or Kerala red spicy fish curry is a spicy fish curry recipe which is usually paired with steamed rice. We Malayalees are very fond of Chorum meen mulakittathum. Especially Mackerel or Ayala mulakittath is one of the favorite fish curry recipes for every Keralites. As rice and fish is a staple food in Kerala, this dish with fish is very popular among Keralites and now among tourists who love this God's own country, Kerala. Fish curry with coconut milk, Kerala fish curry, Goan fish curry recipe, Raw mango fish curry, Gamboge fish curry are some of the popular dishes on my blog. As Malabar recipes are very famous for its unique taste and aroma, let's go a ride through the Malabar cuisine. Here am sharing yet another Malabar delicacy with Mackerel / Ayala fish and Malabari spices. For this fish curry, I skipped the use of ginger and garlic. Still, this curry recipe is super awesome. I have shared  Malabar fish curry recipe with coconut on my blog a few months back and this fish curry recipe is made without coconut.  Hope you all will enjoy this traditional meen curry / traditional Kerala fish curry recipe also for sure. So here is the recipe for Kerala style red hot fish curry/ Malabar meen mulakittath/ Ayala mulaku curry/ Malabar fish curry/spicy fish/ mulaku curry/ mackerel dishes/mackerel recipe/simple fish recipes/how to cook mackerel.

malabar delicasy kerala recipes cuisine Kerala meen mulakittath ayala mulaku curry fish curry kerala style malabar fish curry mackerel fish curry red hot spicy curry seafood curry recipes


Kerala meen mulakittath ayala mulaku curry fish curry kerala style malabar fish curry mackerel fish curry red hot spicy curry seafood curry recipes


Kerala meen mulakittath ayala mulaku curry fish curry kerala style malabar fish curry mackerel fish curry red hot spicy curry seafood curry recipes

Related fish curry recipes

INGREDIENTS

Mackerel / Ayala    - 3 nos, big, cleaned and sliced
Shallots                   - 12 nos, sliced
Fenugreek seeds (uluva) - 1 tsp
Tomato   - 1, big, sliced
Curry leaves  - few
Turmeric powder - half tsp
Kashmir chili powder - 2.5 tsp (can add more as per your spice tolerance)
Coriander powder - 1 tbsp
Tamarind (puli) - gooseberry sized, soak in water
Salt - to taste
Coconut oil - 2 tbsp + 1 tsp (final topping)

PREPARATION

Here is the video showing how to make Kerala style Ayala mulakittath / Kerala style fish curry


  • Clean the mackerel / ayala and slice it and set aside, drained.
  • In a bowl, add tomato slices, curry leaves, coriander powder, turmeric powder, Kashmir chili powder, and salt. Press tightly with your hand and mash it well. Set aside ready.
  • Heat oil (2 tbsp) in a clay pot/ manchatti (preferably) and once hot, add fenugreek seed (uluva).  Saute slightly (do not let it golden) and then add shallots. 
  • Saute it until slightly golden. To this, add the mashed tomato mixture. Combine very well.
  • Let it cook covered until oil floats on the top and tomato turn mushy. 
  • Once done, open the lid and add tamarind pulp by squeezing the soaked tamarind (puli) along with tamarind water. Mix well. Let it cook for a while.
  • Now add a cup of warm water to it and let it cook for another 8 minutes over a medium flame.
  • When done, check for salt and add the sliced fish one by one. 
  • Make the flame medium-low and cook covered for 5 minutes or until fish is done. No need of cooking fish for long. 
  • Once done, sprinkle coconut oil (1 tsp) and cover it. Remove from flame. Let it stay aside for an hour that makes the fish curry recipes perfect.
  • Serve after an hour (preferably few hours). Delicious, finger-licking fish curry is ready.
  • Serve along with steamed rice, chapati, paratha etc.
  • Please subscribe Ayeshas kitchen channel for more cooking videos. Thank u.

Also please watch the video of a special prawns fry below:


Saturday, November 25, 2017

VERMICELLI MILK PUDDING - NO CHINA GRASS NO GELATIN PUDDING RECIPE

DESSERT RECIPES / MILK PUDDING RECIPE

Finishing a meal with a sweet treat like pudding is something which is unaccountable. It is very easy to whip up a simple pudding even after your craving for sweet strikes. I don't have a serious sweet tooth but my cravings for sweets often strikes at midnight which is the worst time for eating. So I go for fruit smoothies only. But last week my craving was a simple pudding and this was that pudding which I make at midnight though I have to wait until morning to taste.  It has been quite long I make pudding at home. Many of my readers requested me to share some simple but impressive pudding recipes on my blog. This milk pudding serves flavors of both roasted vermicelli and rose syrup. Moreover, it is too pretty to eat. Sometimes we really eat with our eyes, especially if it is a dessert. No china grass or no gelatin dessert is the other specialty of this easy pudding. Instead, I used cornflour. This is a Perfect milk pudding, I must say that. Here is the recipe showing how to make simple milk pudding/ quick dessert ideas/easy desserts to make/pudding recipe/pudding without gelatin/gelatin alternative for pudding/cornstarch pudding/vermicelli recipe/ sweet recipes/party dessert ideas.

milk pudding rose milk pudding vermicelli easy simple pudding party desserts unique pudding recipes no chinagrass pudding no gelatin recipes ayeshas kitchen pudding recipes

milk pudding rose milk pudding vermicelli easy simple pudding party desserts unique pudding recipes no chinagrass pudding no gelatin recipes ayeshas kitchen pudding recipes

milk pudding rose milk pudding vermicelli easy simple pudding party desserts unique pudding recipes no chinagrass pudding no gelatin recipes ayeshas kitchen pudding recipes

INGREDIENTS (Ayesha's kitchen)

For vermicelli cups

Thin Vermicelli   - 3 cups
Ghee   - 1 tbsp + half tsp
Sweetened condensed milk - quarter a cup

For the pudding

Milk - 2 cups
Sweetened condensed milk - half a cup (i added less, can add more)
Rose milk essence - 2 drops (for pink color)
Cornflour - 3 tsp mixed in quarter cup of water
Rose water - half tsp, optional

For the pink piping decoration

Half a cup of prepared pudding
2 drops of rose milk essence

PREPARATION

Here is the video showing how to make vermicelli milk pudding


  • MAKING OF VERMICELLI CUPS - First, you have to set aside the silicon cupcake mold or mini cupcake tray. If you are using mini cupcake tray, then seal each cups with silver foil. Set aside ready.
  • Heat ghee in a nonstick pan and roast the thin vermicelli on a medium flame till it turns slightly golden. Then add condensed milk and mix well continuously until well combined for a minute. Add half tsp of ghee, mix it and transfer it to a bowl.
  • Now immediately fill each cupcake mold with this vermicelli mixture while still warm (it will harden quickly so do not let it cool). Press it lightly with your fingers or a spoon to get the shape of a cup.Keep it in the freezer for 30 minutes or for an hour to set.
  • MAKING OF MILK PUDDING -  After 30 minutes, make the milk pudding. Bring to boil milk in a pan over a medium-low flame. Once the milk boils, add condensed milk and mix very well constantly (as the vermicelli cups are sweet, I added less sweet for pudding. But sweet lovers can add 2 tbsp of sugar too for the pudding). Stir continuously for 2 minutes. 
  • Then add few drops rose milk essence to the milk and stir.
  • Add cornflour mixed water (mix cornflour in a quarter cup of water) and stir continuously (do not take off your hand). You can see the mixture starts to thicken. Stir for 2 minutes over low flame until the mixture thickens enough to coat the back of a spoon and remove from flame.
  • FOR THE PIPING - Reserve quarter cup of the pudding mixture to a bowl and add few drops of rose milk essence. Mix well with a spoon. Transfer it to a piping bag and keep refrigerated until the pudding is set. 
  • Take the vermicelli cups out of the freezer. Stir the pudding mixture and pour the pudding mixture into the vermicelli cups. Snip off the tip of the ping bag and make your designs. Now keep it in the refrigerator to set( not in the freezer). Chill for 6 hours and serve. 
  • Please subscribe my channel Ayesha's kitchen for more recipes.